Ensuring the trees on your property are well-tended is an essential part of responsible home maintenance. Proper pruning not only enhances the visual appeal of your surroundings but also promotes the health and longevity of your trees. This detailed guide is designed to assist homeowners in mastering the art of tree pruning, a process that requires precision and safety. Here at Root Branch N’All, we understand the intricacies involved in tree care, which is why we present you with a step-by-step method to help you learn how to confidently manage your tree pruning tasks.
Nurturing Trees with Careful Pruning
Pruning is a nuanced practice that, when done correctly, can revitalize trees and prevent disease. Understanding the basics of evaluating a tree’s condition, selecting the right tools, and utilizing proper techniques is key to successful pruning endeavors.
Trees in residential settings often require a more delicate approach than those in open fields due to space constraints, neighboring properties, and pedestrian safety. As pruning significantly impacts the tree structure, it’s crucial to have a well-laid plan before snipping those branches. Let’s delve into the details of each step to achieve a pruned tree that’s not only aesthetically pleasing but also poised for healthy growth.
Step 1: Assess the Tree
Identify the Type of Tree
Different trees require different pruning approaches. For instance, conifers might not need as much shaping as broad-leafed trees. Before picking up any tools, familiarize yourself with the specific needs of the tree species you are tending to. Check out THIS GUIDE on how to identify your tree.
Unsure what you’re looking at? Call an expert to help you out!
Determine the Best Time for Pruning
Timing is everything in the tree care world. Typically, the late winter season, when trees are dormant, is ideal. This is because the absence of leaves allows for easier inspection and reduced stress on the tree.
Step 2: Gather the Right Tools
List of Essential Pruning Tools
- Hand Pruners for small branches
- Loppers for branches up to 2 inches in diameter
- Pruning Saw for larger branches
- Hedge Shears for uniform trimming
- Pole Pruners for hard-to-reach branches
Safety Precautions
Safety goggles, a hard hat, and protective clothing are non-negotiable when pruning trees. Always ensure the ladder is stable and someone is present when you are working on a tree to assist or to act as a lookout.
Step 3: Pruning Dead or Damaged Branches
Identifying Dead or Damaged Branches
Dead branches are brittle and often devoid of bark. Damaged branches show signs of stress, such as split or peeling bark. Both of these can be hazardous and should be removed.
Proper Technique for Removing Them
Make a clean cut just beyond the branch collar, ensuring not to leave a stub. The branch collar is the swelling at the base of a branch where it joins the trunk. Cutting too close to the trunk can damage the bark and open the tree to infections.
Step 4: Thin Out Excess Branches
Selective Branch Removal for Better Airflow and Light Penetration
Overcrowded branches can prevent sunlight and airflow, leading to disease. Selectively remove branches to open up the tree canopy and allow for a more balanced branch structure.
Guidelines for Thinning Out Branches
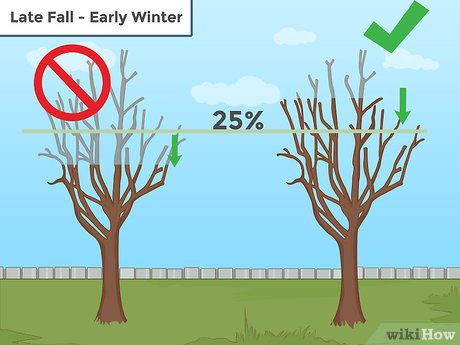
Begin by identifying the central leader and main branches. For larger trees, it may be necessary to hire a professional arborist to assess and thin out branches. For smaller trees, aim to remove no more than one-third of the live branches in a season.
Step 5: Shape the Tree
Techniques for Shaping the Tree
When shaping a tree, it’s important to maintain its natural form. Avoid topping, a harmful practice that removes the upper canopy of a tree, and focus on removing undesirable branches that may interfere with the tree’s aesthetic.
Maintaining the Tree’s Natural Form
Prune branches that grow inward towards the tree’s center or those that grow at odd angles. Encourage the tree’s natural shape as it’s well adapted to its environment.
Step 6: Clean Up and Disposal
Proper Disposal of Pruned Branches
Dispose of removed branches by chipping for mulch, taking them to a green waste facility, or using them for firewood. Avoid leaving branches near the base of a healthy tree, as this can create a haven for pests and diseases.
Clean Up After Pruning is done
Once the pruning is complete, clear the area of any debris. Pruning cuts are wounds, and a clear area reduces the risk of disease entering the tree.
Conclusion: Regular Pruning for Tree Health and Aesthetics
Tree pruning is a blend of art and science. Regular attention to your tree’s needs through the seasonal pruning of dead, diseased, or interfering branches ensures optimal health and beauty. Remember, if the task seems too daunting, it’s always best to consult with a professional tree care service like Root Branch N’All. Our friendly team in Dickinson, Texas is here to provide you with a free estimate and expert advice on all your tree care needs.
By mastering these pruning techniques, you are investing not only in the present beauty of your landscape but also in the future magnificence of your trees. Stay informed, stay safe, and watch your trees flourish.
